RBG and The Scrunchie Revival

VTNF Picks

After months of icepick-to-the-eye news updates to the likes of “140 Whales Get Stranded in Austrailia” and “‘Two Minutes to Midnight!’ says the Doomsday Clock” it is understandable that I, like many, have elected to receive push notifications from Postmates exclusively.

02-ruth-bader-ginsburg-scrunchies.jpgUntil last week, of course, when news (randomly?) broke surrounding Ruth Bader Ginsburg’s twenty-five years as a dedicated defender of exorbitant headwear. And, in the sea of articles examining Russian collusion and White House lawn wrestling matches, I — first the first time since 2006 — voluntarily clicked on something published by Fox News. They’re not the only ones calling it, either. WSJ recently published this piece about the scrunchies place in the office (thanks, Casey!) and The Guardian related its revival with the release and success of I, Tonya

I have always found accessories of the large and loud variety empowering, and if you haven’t noticed, hold a distinct preference toward jewelry that doubles as a self-defense weapon. There’s some magic in wearing a giant pair of turquoise tassels within the sea of gray suits in Farragut West, or a conversation sparked simply because your ears happen to be housing two piñatas. Accessories allow us to exert fun into everything from a  black-tie ball to a Monday morning commute. And in today’s political climate, I don’t think RBG’s penchant for the immoderate is an accident at all. In the nation’s highest court, a statement necklace or patterned scrunchie says, “I can be loud, too.” without ever saying a word. 

Below, I’ve rounded up the best scrunchies the internet has to offer, many of which clock in at under $10. Scrunchies are a great way to accessorize a more simplistic, dressed down look or provide your outfit an alternative to statement earrings. Trust me, your hair will thank you. 

Scrunchies

Leopard Print Tie // Stripes + Pineapples // Two-tone Gingham  (cheaper here) // Retro Lines // Metallica // Tropical Red // Yellow Florals // Red + White Stripes // Sequin Neutrals // Mauve Velvet // Flamingos + Palm // Bow Mini Ties

Overall Winner: Overalls for Spring

VTNF Picks

Yes for spring: overalls! I feel confident I do not need to explain why. Below, I’ve outlined my four overall picks for your clicking pleasure.

OVERALLS4.jpg
Fit + Flare // Rips + Tears // My Favorites // In White

Now that you’ve got the crust for your outfit pie, let’s start adding the other ingredients, shall we? Below, find three fool-proof, overall-friendly looks you can easily pull together in time for happy hour.

OVERALLS1FINAL.jpg
Exact Top // Top in Pattern Print // Exact Overalls // Earrings // Cuff Bracelet // Wedges

OVERALLS2.jpg

Striped T-Shirt // Blazer // Mules // Earrings // Earrings #2

OVERALLS3.jpg

Striped Top // Sweater // Wellies // Earrings

xxac

PrimesFinds

Celebrate the Blossoms with a Booze-Infused Layered Cherry Tart

Food + Recipes, VTNF Picks

The cherry blossoms are allegedly blooming this weekend, which, apparently, is a horticultural phenomenon ripe with controversy. I can think of about 9,000 other controversial topics our time may be better spent pondering, but I suppose in a city of nerds, peaking early is something with which we are not accustomed. 

For our intents and purpose, an early bloom is great, because we now have a few more weeks to enjoy this booze-infused cherry layer tart without the Memorial Day Weekend calendar square peering over us judgmentally. So, pull up a seat and prepare for a layered dessert that brings a tidal of flavor (with no trip to the Tidal Basin required.) 

This recipe yields two dessert jars. 

What You’ll Need 

cherry-blossom.png 1/2 cup of fresh or frozen cherries. 

 cherry-blossom.png 3/4 cup of cherry pie filling

cherry-blossom.png One cup of heavy cream.

cherry-blossom.png One or two tablespoons of Maraska Maraschino Cherry Liqueur.

cherry-blossom.png Two dark chocolate Hershey’s bars. (Three if you know you’re probably going to eat one on the way home.)

cherry-blossom.png Two tablespoons of shredded coconut

cherry-blossom.png One pre-made graham cracker crust. 

Do you find grocery stores more emotionally exhausting than a Bachelor reunion special?   Try an AmazonFresh Free Trial, instead!

The Moves 

Booze-Infused Whipped Cream 

x1f352.png.pagespeed.ic.-ZRiMmAyar.png Start by beating 1 cup heavy cream in a large mixing bowl until ~*soft peaks*~ form with a stand mixer, a hand mixer, or your arm and a whisk if you’re looking to add an element of drama. 

x1f352.png.pagespeed.ic.-ZRiMmAyar.pngAdd a generous tablespoon of Maraska Maraschino Cherry Liqueur and gently fold in and taste. Feel free to add more liquor if you like, party girl, but only if you plan on enjoying it in bed — this stuff is strong! 

How awesome are these cherry tea towels from locally owned Comet Cloth? Shop the whole selection here!

Layered Cherry Tart

x1f352.png.pagespeed.ic.-ZRiMmAyar.png Once your frozen cherries are thawed, combine your cherry pie filling and halved cherries together. You should prepare about a cup and half. Bonus points if you let your cherries soak in liquor overnight! (Apparently, rum is the best for this.) 

x1f352.png.pagespeed.ic.-ZRiMmAyar.png After that’s finished, put your Hershey’s bars in a Ziplock bag and crush them into pieces with something heavy. Again, you could just buy pre-made dark chocolate morsels, but I like to ham up the drama when I cook so I can use my hard work as leverage against my boyfriend during our next argument. 

x1f352.png.pagespeed.ic.-ZRiMmAyar.png While you’re at it, smash up that pie crust, too. From there, put the chocolate morsels, broken-up pie crust, and shredded coconut into a Pam-sprayed pan and heat on low until the chocolate gets gooey. 

x1f352.png.pagespeed.ic.-ZRiMmAyar.png While that’s cooking, start by adding a bottom layer of cherry mix to the jar. 

x1f352.png.pagespeed.ic.-ZRiMmAyar.png Next, add your boozy whipped cream, which can be transferred by spoon or turkey baster if you’re concerned about #aesthetics. 

x1f352.png.pagespeed.ic.-ZRiMmAyar.png From there, add your warmed pie crumbled-chocolate-coconut concoction as the next layer.

x1f352.png.pagespeed.ic.-ZRiMmAyar.png Repeat the process until your jar is full. Feel free to take some creative liberties on the proportions of the layers — there’s literally nothing that isn’t delicious in this dessert. A bigger mason jar will hold about six or seven layers, and this recipe makes enough for two jars. 

x1f352.png.pagespeed.ic.-ZRiMmAyar.png Nuke your masterpiece for 10-20 seconds, top it with some leftover chocolate or coconut, and enjoy something cherry in the comfort of your very own, tourist-free home. 

Do you find grocery stores more emotionally exhausting than a Real Housewives reunion, too? Try an AmazonFresh Free Trial, instead!

xxac

Prime Find: the MicroPure Heated Brush

Amazon Prime Finds, Self Care, VTNF Picks

Hey, team! This month’s Amazon #PrimeFind is a little different, and so, so good. 

It’s hot. It’s a brush. It’s a hot brush. It does all the work of your straightener — plus some! — and affords your non-dominant hand the freedom to roam to the nearest bottle of wine. At a $40 price point, it’s a steal, in my opinion. I’m so happy that there’s finally a tool on the market able to make the back of my head look like the front of my head, and this brush is perfect for smoothing hard-to-reach areas. 

PrimeFind3

It only took fifteen minutes for me to go for wavy to straight, which is really impressive when you consider the fact I have a massive head (file that in the “awesome genetics” folder right next to “strangely dark body hair.”) 

PicINeed3..jpgShop my go-to serum for a sleek pony here, too. 

If you’re ready to take the plunge into heated brushing, order the MicroPure brush here. Each comes with a pouch and heat-protective glove. The brush itself is super easy to use, has adjustable heat settings between 350 and 450 degrees, and warms up super quickly. It helped me shave ten minutes off my routine, which I successfully completed while drinking wine in bed

unnamed-2.jpg

Click here to place your order, and here to fill your cart with more of my favorite Amazon Prime Finds! 

FOLLOWME

Paraíso Perdido: Gabby Buda Talks Picking Up the Pieces in Puerto Rico

VTNF Picks

When Gabby first told me she was going to Puerto Rico, I thought she was kidding. In hindsight, I don’t know why I thought that; a former beach lifeguard, avid traveler, and environmentalist, Gabby is one of the savviest and self-sufficient travelers I know — she did survive four days in the desert with me, after all.

Abby Colby Gabby Buda

Taken right before Gabby left to save the world and I spilled this Bloody Mary on myself.

That said, in fall of 2017, Puerto Rico was not a place many wanted to be. Disaster-ridden and a focal point of national controversy, the American media chose to focus more on the money involved in recovering the island than the fact there were human beings — human beings who welcome many “mainland Americans” in to enjoy their homeland’s culture, food, beaches and nightlife year after year, no less — who were now without basic necessities like water, electricity and food.  During what felt like a never-ending news cycle of natural disasters barraging our coastlines in 2017, many of us became exhausted by one depressing headline after the next, and checked out when the area in question wasn’t as relatable as Texas or Florida. I’ll be honest; I didn’t feel a personal connection to Puerto Rico until one of my best friends decided to aid them during one of their darkest hours — not because I didn’t care, but because I didn’t know.

If you share this perspective, I hope this interview will shed some light on Puerto Rico, its people, and what exactly goes into storm relief efforts from the perspective of someone who has been there. An environmental scientist for the EPA, Gabby has completed three voluntary recovery trips to Puerto Rico, and she expects there will be more to come. 

If you feel compelled to make a donation, I’ve provided links to relief organizations in Puerto Rico at the bottom of this post.

Four Months, Three Trips to Puerto Rico

IMG_8207

Let’s start with #thebasics. What is your role within the EPA?

I am an environmental scientist and also have a specialty in emergency response, specifically resource management, personnel management, inter-governmental coordination and drinking water quality analysis. 

What were your thoughts about Puerto Rico before the storm? Did you visit PR in years prior?

I always thought of Puerto Rico as a beautiful Caribbean Island, and I had visited Puerto Rico just a year and a half ago for vacation with my sister and some friends. We stayed in Old San Juan and I was truly blown away by the architecture and scenery – it is one of the oldest cities in the U.S. I felt at ease during my vacation, in large part because the Puerto Rican people are extremely warm and welcoming, and I fell in love with the culture, the people, the food, and the music.

What compelled you to join the U.S. government’s relief efforts in Puerto Rico?

As a trained member of the emergency response team, I was requested to deploy to Puerto Rico for the hurricane relief effort. I wanted to help because I knew the state of the island was in and how desperately it needed basic necessities like clean drinking water, which is what I specialize in within the EPA.

IMG_8210

Before your first deployment, what were your expectations and how did the EPA prepare you?

The news was depicting a devastated, desolate island with no power, no running water and no means of communication, so that’s what I was expecting. My first trip was in mid-November, approximately 47 days after Hurricane Maria. That sounds like a long time, but because of the amount of damage that was inflicted from the hurricane and the government’s slow monetary response, the island was still extremely devastated. Prior to deploying, we were briefed several times on what to expect, current conditions and equipment/supplies to pack. In that sense, I felt adequately prepared, however, you can never be prepared enough for an emergency – even after it has already happened.

 So, after you arrived, what were the first 24 hours like?

When I was on the plane about to land in San Juan, I remember looking out at all the neighborhoods and houses in the surrounding areas of the city, and all I could see was a sea of blue. (Editor’s note: blue is the color of FEMA tarps that help protect damaged homes from the elements.)

PRPic1

Upon landing, driving conditions were extremely dangerous as most traffic lights were out and there were downed power lines, trees, and debris all over the roads. GPS signals were also not working, so I was relying on a map to drive to the island’s west coast.

All the trees throughout the island, especially in the mountain regions, were bare if they were even standing at all. I passed by houses that were destroyed, beaches washed out, grocery stores and malls all boarded up.

The day after my flight we started with an early morning meeting to discuss planning, logistics, and resources. Obtaining resources was somewhat of an issue because there were so many in high demand — the feeling of panic and confusion was palpable among our team of government employees, too.

What city do you stay in while you’re there? What are the accommodations like?

We stay at a hotel in Mayagüez — known as the “City of Mango” by locals — which is located on the west coast of the island about 15 miles south of Rincón. The accommodations aren’t horrible, but they are far from luxurious. We have running water and electricity, so we were better off than most of the island during my first trip in the fall.

IMG_8204

What specific aid are you providing in Puerto Rico? What is a typical day like?

I was focusing on tasks related to environmental and health hazards, including cleaning up oil spills, hazardous and toxic substances, and testing for safe drinking water.

Most mornings, we stock our vehicles and drive into neighborhoods in order to distribute food and water to citizens, and also interview residents about anything else they may be in need of (think generators, medications, etc.).

I also act as a liaison between citizens in need and other agencies like FEMA and the Red Cross, who also have a presence on the island and actively provide support and resources.

unnamed-7.jpg

I never realized you had so much interaction with the actual citizens of the island. What surprised you the most about the people of Puerto Rico?

Far and away, how positive and gracious the Puerto Ricans are and continue to be. From my first visit in November to now, I am still so shocked and humbled by the positivity, graciousness, and appreciation among Puerto Rico’s citizens. I have met and worked with so many of the locals who have basically lost everything — their entire house, car, etc. — and, yet, they are still positive and appreciative of any assistance they receive. Their gratitude makes the whole experience so much more rewarding.

I remember one day I was working up in the mountain region in a small town named Las Marias – an area that had been severely impacted by the storm. I had cases of water in the trunk of my truck and had pulled over in a neighborhood to get out and walk around to see if any of the residents needed anything. As I was walking around asking, I came across an older woman and I asked if she “Necesito agua?” (my Spanish isn’t the best). She misunderstood me and assumed I was asking for water for myself, so she went into her half-fallen down house and brought me out a bottle of water. Seeing the state of her house, I knew she did not have a large supply of water, and yet, she was willing to help me: a complete stranger. I can’t help but wonder if people would still be positive and appreciative if a similar situation happened in the America that we know.

It must be so bizarre to see these once-popular tourist areas completely destroyed – the way you describe it reminds me of the Upside Down in Stranger Things. What was the biggest challenge you faced during your deployment?

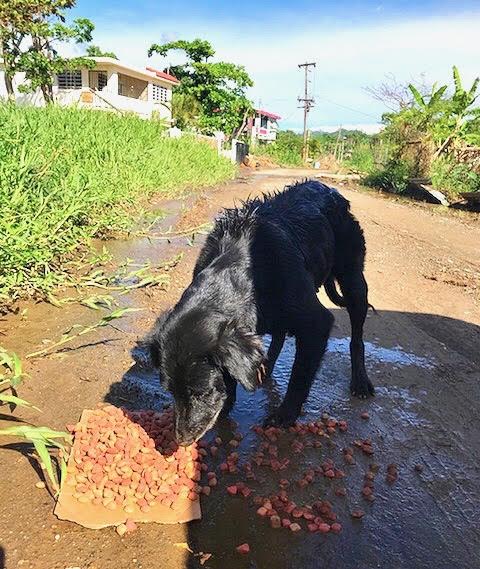
The abandoned animals. Being an animal lover, I got really upset seeing abandoned dogs, cats, and horses. I would carry dog and cat food in my vehicle to feed the animals. I would also take care of animals on my very few days off. I saw so many dead and emaciated animals – it shattered my heart — and so many of them are just left on the shores to fend for themselves.

Gabby and India

Gabby and Índia, a new friend.

Once I got more comfortable on the island, I coordinated with non-profits like The Sato Project who take location reports of animals in need and send personnel to help them and bring them into a shelter. From there, they work with veterinarians to have dogs checked up and cleared to fly to The States to be adopted.

unnamed-8.jpg

That sounds so emotionally draining, especially when you consider all of the people in need in PR right now, too.

One of the most heartbreaking situations to deal with is trying to comfort someone that has lost their entire home, or has been living without power and running water for months. Nothing can prepare you for that.

No one talks about how Puerto Rico’s suicide rate spiked in the months following the storm. In one instance, I remember encountering a woman who was outside of her house cleaning debris off her lawn. My team and I stopped to check in and see if she needed anything, and as soon as she saw us she immediately broke down crying. She then proceeded to tell us about how her 24-year-old daughter had recently committed suicide after months without power, running water or communication with the outside world. It was devastating.

Not long after that, we met a cancer patient living up in the municipality of Utuado, a particularly mountainous region of Puerto Rico that cutoff by landslides after the storm. Without power, she was unable to keep her medications cold, and by the time we encountered her she was extremely panicked and distraught about the possibility of them becoming ineffective — I remember feeling so helpless and scared for her. Luckily, we were able to get in contact with FEMA in order to bring her a generator for her refrigerator within a few days.

These are just two examples of so many interactions I will never forget, and no matter how much suffering I encounter, I will always wish I could somehow do more.

IMG_7607

How has your perspective changed since returning? What drives you to keep venturing to the island again and again?

In the beginning, I was feeling discouraged and disappointed about how much work still seemed to be left even after months of recovery efforts. That said, each time I return to the island, I do see that progress is being made.

The people of the island keep me coming back — they are what drives me to sacrifice my time at home and to put as much hard work as I can when I am here. After getting to know the citizens and the culture of the island, I’m happy to do anything that makes even a small difference.

How has Puerto Rico changed since your first trip? Have you seen improvements?

I have seen improvements from my first trip. In fact, the way Puerto Rico is now, it’s hard to picture the devastation that existed just a few months ago.

There are still many areas without running water or power, but conditions continue to improve. Unfortunately, Puerto Rico will never be the same as is was pre-Hurricane Maria. Some areas of Puerto Rico may never get power back or rebuild their houses, and many residents have left the island with no plans to return, so economic recovery efforts are far from over.

What is the biggest misconception mainland America has about Puerto Rico? What do you wish more people realized?

I wish more people realized that the people of Puerto Rico are doing a lot of work to help each other out and help the island to recover, as I think the biggest misconception is that Puerto Rico is not doing enough to help themselves and are relying solely on the U.S. government. We see a lot of residents passing out water and food at collection points throughout the island, water, and food that they purchased themselves. We see residents working to fix their houses themselves, without any assistance. The people of Puerto Rico are extremely resourceful and hardworking, which I have seen throughout the island during my time here.

 That’s incredible. What’s next?

I am currently in Puerto Rico and am leaving on March 13th. The FEMA budget was extended by 60 days, and thus that also extends the EPA budget by 60 days. So much work still needs to be done, and I am glad the response budget extension was ultimately passed – it is so, so needed. I will most likely be requested to return to PR at the end of April or in early May.

How You Can Help

Per Gabby’s recommendation, consider donating to The Sato Project, which supports abandoned pets in Puerto Rico, Unidos por Puerto Rico, a group targeted at restoring small businesses affected by Hurrican Maria, or the American Red Cross — March 28 is Giving Day! If you want to add more #TravelGoals to your feed, keep up with Gabby here!

xxac

All photography provided by Gabrielle Buda. Interview condensed and edited for clarity. 

Heavy Beer, Heavier Ears: 20 St. Patty’s Day Statement Earrings

VTNF Picks

You guys know I never met a pair of big earrings I didn’t like, so today, we have twenty to enjoy! Featuring some of my favorites like Lizzie Fortunato, Mercedes Salazar, and Ranjana Khan, I hope this list makes you happier than a Jameson-drunk leprechaun in a field of four-leaf clovers.

GREEN: OPTIONAL; GLAM: REQUIRED.
GreenPost1
TOP // Sarbani Statement Earrings, $140 //  Kate Spade Emerald Studs, $38 // Crystal Pineapples, $16
BOTTOM // Kendra Scott Pearlescent Earrings, $250 // Green Crystal Stacked Earrings, $34, Pink Agate + Green, $171
 I LIKE MY JEWELS HOW I LIKE MY BEER; DARK.

Greencover2_final.jpg

TOP // Ranjana Khan Bow Clip-Ons, $340 // Lizzie Fortunato Meteor Earrings, $230
BOTTOM // Matte Gold Emeralds, $148 // Lisi Lerch Emerald Tassels, $98 ($30 version here) // Lizzie Fortunato Rosa Earrings, $345
KELLY GREEN FOR GOOD LUCK.

GreenColor3_Final.jpg

Top // Monse Cufflink Earrings, $290 // Green Ear Jackets, $10 // Crystal + Green Drop Earrings, $210 (similar version for $40 here)
Bottom // Ranjana Khan Bonita Earrings, $425 // Sachin + Babi Beaded Clip-Ons, $275
LIGHT GREEN, HEAVY POUR, A TRUE TOP OF THE MORNING.

Greencover4updated.jpg

Top // Elizabeth Cole Toucan Earrings, $/198 // Mercedes Salazar Lemon Hoops, $173 // Avocado Studs, $12 // Lime Puskul Earrings, $129
Bottom // Mercedes Salazer Leaf Drop Earrings, $220  Lisi Lerch ViVi Earrings, $98

xxacPrimesFinds

Micro Blade, Big Decision

Self Care, VTNF Picks

Hey guys! Of the ten people who read my blog, this has been my most requested post, so here it goes.

I am not using this as an opportunity to give you a step-by-step through the process of microblading. There’s plenty of information on how microblading works and the best resource for specific questions you have is your brow stylist — it’s extremely important to consider their recommendations and after-care instructions. I am not the person to provide those to you!

That said, as with any major procedure, there are some general things I wish I had known before going under the blade. And, no, this isn’t intended to steer you away from microblading — I would do it again in a heartbeat! — but it isn’t for everyone.

Ask yourself: how much does the appearance of my brows impact me physically, mentally, emotionally and spiritually? For me, the answer was “A LOT.” I, like many victims of the mid-00s Laguna Beach madness, plucked the sh*t out of my naturally dark, thick brows in an effort to look more like Lauren Conrad. Now they hate me, and refuse to grow back. Even though the hair on my head is brown, my body hair is actually a near-black color (lucky, right?) and my eyebrows are easily my most prominent facial feature.

After years of countless Youtube tutorials, trial-and-error and eyebrow pencils (P.S. you can shop my favorite eyebrow pencil here!) I had finally created a brow formula that worked for my face. It was pretty glorious, but I also felt like I was living a lie, and rogue water splashes were always an area of concern (they happen more than you think.) 

PrimesFinds

Essentially, I am someone whose eyebrows literally and metaphorically enter the room a good ten minutes before I do. That said, if you are a blonde or redhead, someone who kept their eyebrows intact during the reign of Justin Bobby, or don’t really feel like your brows are the focal point of your face, I say stick to manual fill-ins. Bladin’ ain’t cheap, fam! Also, I’ve heard a lot of great things about this ANASTASIA growth serum, which could be a less-invasive answer to your brow-related concerns.

Know your coloring. If you’re still reading this, I can assume two things: you are also a slave to your eyebrows, and you probably just finished up skimming Justin Bobby’s Wikipedia page (spoiler alert: he’s a hair stylist now.)

Some people have red undertones, and some people have ashy undertones. No, one is not better than the other, and yes, you will immediately notice if you’ve ended up in the wrong camp. Over the years, I would sometimes buy a pencil with red undertones, and could immediately tell something wasn’t right! Of course, this is a better conversation to have with your brow stylist, but while you’re considering what shape you’d like for your brows make sure to take this into account, too.

There will be blood. The process started out pretty painful. More painful than I had anticipated – probably on par with a bikini wax, but like, a prolonged bikini wax. That said, my stylist added numbing cream throughout, so the pain wore off within 3-4 minutes as she continued the procedure (which took about two-and-a-half hours, FYI.) When it was finally over, I sat up at saw a number of used wipes stained with red, which I then realized — in my post-blade haze, of course — were stained with blood. I’m not a particularly queasy person, but this did flip me out a little because I had been completely numb for the majority of the procedure. That said, bleeding is a normal and expected!!!

My stylist made a pretty big show out of showing me the different equipment, taking a new blade out of the packaging, and instructing me on how everything is kept clean before, after, and during. At the time I was like “yeah, okay, cool, you got it” but once I saw #theblood, I was extremely grateful to know I had chosen someone who takes safety and sanitation so seriously.

ShoptheGram2

You won’t know what the finished product looks like for at least a month. Despite the actual bloodbath, I actually walked out with awesome, normal-looking brows – know that this won’t last. Most of the “after” photos you see online are RIGHT after the procedure, with fresh ink. Your brows will end up looking like a close variation of this, but there’s a good month of healing during which your brows will go through more phases that a 12-year-old who just transferred into public school.

The first week was the hardest, by far. Your brows will take on an extremely dark, thick appearance that I can only describe as “the Sharpie effect.” I knew that this was all part of the process but that didn’t stop me from panicking the first few days! In reality, this is the ink and blood rising to the surface and doing its thing, so stay calm and don’t touch other than to apply whatever ointment, etc. your stylist has provided to you. BTW, the first week is pretty intensive after-care wise, as well, so I recommend scheduling your appointment for a time in which you have nothing going on few a few weeks.

IMG-7960

From there, the ink will start to “chip off.” Again, this is #NotCute but also not hugely noticeable to anyone other than you, either. I remember demanding my friends not look at my brows two weeks after the procedure, to which they responded “Did you do something to your brows? We didn’t notice.” Not everyone is brow freak, fam. Maybe that’s a good thing.

Be prepared to live like an unathletic vampire for a few weeks (or, invest in some cute hats.) Sunlight can be extremely damaging to your brows within the first month, so if I could go back, I would definitely schedule my appointment for some time other than the middle of June! When I was going outside, I just wore a hat, which shielded the affected area pretty substantially. Also, sweating is forbidden for the first ten days, so steer clear of this procedure if you’re training for a marathon, teaching hot yoga, or really doing any form of walking in DC from May-September.

A touch-up is required and often included. Don’t expect a perfect look on the first try. There will be some unevenness and missed strokes, which is why a lot of microblading procedures include a complimentary touch-up. Be sure to schedule that six weeks out from your first appointment to ensure the salon doesn’t fill up! When you do go in for your touch-up, write up a list of things you’d like adjusted so you don’t forget anything before the blade gets stroking. (….Why does that sound so overtly sexual?)

unnamed-1

Under-doing it > over-doing it. Adding in a few strokes with a pencil for special occasions or scheduling another follow-up appointment is a lotttttt less complicated than getting strokes removed, which requires a process akin to tattoo removal. So, stalk your stylist’s previous work, use pictures give them an idea of what you’re looking for, then let them use their best judgment. The allure of full brows can have a strange effect on people – if the stylist says “no more,” then no more! Mine basically had a to talk me out of a full unibrow, and I am forever grateful for her honesty with me.

Almost a year later, mine have stayed pretty much the same. Of course, everyone is different, but I think this is good to know! 

TL;DR

Consider your current relationship with your brows and how microblading could improve or streamline your current beauty routine.

Book your appointment during a time you can avoid sweating, prolonged sun exposure and special occasions for a few weeks.

Research your stylist and stalk their work and Yelp reviews ad nauseam. I saw Hasti at Brow Bar DC, 10/10 would recommend to a friend.

It won’t be perfect on the first try.

Under-doing it > over-doing it.

That’s all! Happy blading!!! 

xxac

FOLLOWME

Framing Things with Sarah B. Keating

VTNF Picks

Books, bags, boyfriends; you can frame anything if you set your mind (and X-ACTO Knife) to it!

I called on long-time confidant and interior muse, Sarah B. Keating, to discuss one of my favorite things about her apartment: all of the random things on the walls. Seriously, everything from luxury garment bags to salt and pepper shakers aren’t safe in Casa de Keating, resulting in multiple, gorgeous gallery walls that include exactly zero prom photos.

IMG_6953.jpg

Through a strategic and deliberate PR strategy, I was able to sit down with Sarah Keating, who graciously offered all of her advice on framing (and life.) Enjoy!

What initially inspired you to start experimenting with frames? I started framing non-art when I started paying my own rent. I couldn’t afford to buy art and since I work in a creative field, I like to be surrounded by things that inspire me.

Where do you go to find frame-spiration? Anything from wrapping paper at TJMaxx to ads in Vogue. Also, as an art school dropout, I create some of my own art with Adobe Indesign. Also, if you’re going for a specific color scheme, Etsy is a great place to original, unique prints of varying sizes.  

If You Can Dream It, You Can Frame It

ø Images from books: coffee table books, thrift store books. Be sure to check out the Kate Spade and Gary Malin books that helped add flair to each of her gallery walls.   ø Garment bags (!?!), as shown below. (Editor’s note: you can buy these on Poshmark!)
ø Recipes. I think framing a handwritten recipe from your favorite relative is a beautiful gift!
ø Fabric swatches and scarves.
ø Magazine and news clippings. The moon landing, Paris Hilton’s mug shot. Ya know, historical stuff. 
ø Internet things, and obviously, photos. S.K. recommends printing them at Walgreen’s for a cool $4.99.
ø Maps. S.K. recommends Bank & Surf Custom Maps for high-quality options that come already framed!
ø Actual objects. Sarah has a cork, amethyst stone AND these salt and pepper shakers in the mix.

unnamed-1.jpg

What You’ll Need to Get Started

ø An X-ACTO Knife and maybe a grid mat, too.
ø Double-Sided tape (generally super helpful in life).
ø Mod Podge (if you’re planning to mount the image on wood)

Step-by-Step

I put these Keating-approved tips to the test and made a frame of my own. For all of $10 and ten minutes of work, I am ob👏sessed.

Step 1: Find something to frame.

IMG_6453

I spent a whole $2 on this watercolor book that I’m fairly certain pre-dates Pinterest. It was sold to me by the sweetest volunteers working the Opportunity Shop at St. Alban’s School. Highly recommended if you can sneak away for some mid-day thrifting!

Step 2: Make sure it’ll fit.

IMG_6474

Hold the frame up to images you think may work for your frame to get an idea of how it’ll look together. This will save you and your fingers a lot of time and effort!

Step 3: Cut it to size

IMG_6485

Once you’ve made your selection, use an X-ACTO Knife-knife to cut the image to fit. If it’s a larger image, be sure to continually “test” it in the frame so you don’t accidentally cut out your favorite part! Also, is there anything more satisfying than cutting with an X-Acto??

Step 4: Frame.

IMG_6584

Ta-da! This is an image taken from the book called “Winter Evening at The Rio Grande Valley” by Fremont Ellis. The Rio Grande Valley is in South Texas, FYI. (I thought it was in Utah….)

Pro Tips

Keep my frames clean with Windex wipes, because I don’t like spending more than 90 seconds on any one task. Great for mirrors, too.

IMG_7956-11.jpg

If going for a three-dimension option, make sure the objects are not too heavy for the frame, as they can easily fall when hanging. 

Decide on a theme, then run with it. For a client’s gallery wall, she created this awesome pink and blue spread with an oceanic theme (pictured below.)

IMG_2887-1.JPG

They make great gifts, too. Keating’s gallery wall includes a champagne cork from a family celebration and other unconventional momentums. 

Frames We Love

For simple black and white frames for gallery walls, S.K. recommends getting started at IKEA and Joann Fabrics, or allow Framebridge to do the dirty work for you! That said, if you’re looking for a little chutzpah, look no further than the picks below! 

FramePic!

1 // 2 // 3 // 4 // 5 // 6 // 7 // 8

Keep up with Keating — and check out more of her gorgeous work — here!
Featured photography provided by Emza Joy Photography, @emzajoy, and Sarah B. Keating.

xxac

In Defense of Oversized Blazers.

VTNF Picks

Calling it now: oversized, or “boyfriend” blazers — as vernacularly misguided retailers would have us call them — will be the transitional piece of the season. Versatile, muted and easy to throw on a Canadian tuxedo or mini dress,  I’m planning on draping one of these over my shoulders every time the weather, and outfit, permits.

IMG_6427

Recreate the look: J.O.A. Blazer // The Fifth Label Blazer // SMYTHE Blazer // Alice + Olivia Blazer //  T-shirt // Necklace (similar) // Jeans

Here’s some more intel: it’s really, really easy to repurpose a thrifted men’s jacket or blazer for this purpose. The $8 Henri Bendel windowpane blazer I’m wearing in the photo above ended up making a playing a pretty convincing lookalike to Tory Burch’s $500 version last spring — one of my prouder moments as a shameless patron of Goodwill. If a jacket has shoulder pads, I simply take an Exacto-knife against the inner seam and remove the stuffing. You can resew it, from there, but it’s probably unnecessary. 

Below, I’ve listed a few things I look for in a boyfriend…blazer. 

Structure. Get you a blazer that can support itself, and you, too. I can always spot a blazer made with cheap material because it hangs on the shoulders, as opposed to sitting on the shoulders. I like blazers that are made using a sturdy fabric and are fully lined — this will add the hallmark, tailored feel that blazers provide to your look du jour.

Length. A blazer that hits right below your pant’s zipper is flattering, however, one that extends to your mid-thigh may shrink you and make your legs appear shorter. Consider this while picking out yours. 

Cuffing Potential. Important to consider in many areas of life. Make sure you cuff the blazer to see if you like the lining as much as the exterior.

IMG_4851

Sizing. Size matters, fam. If you intend on repurposing a vintage or men’s blazer (which I can’t recommend enough!) check to see if you’re swimming in it, and if you are, if there’s potential for it to be tailored. It’s easy to cuff too-long sleeves, but a blazer that has too much material, in general, may not afford itself well to your outfit. That said, there’s always the option to drape the blazer over your shoulders, instead. I’ve found helps lighten things up. 

Below, I’ve included my favorite oversized blazer picks for spring! 

Blazers updated.jpg

1 // 2 // 3 // 4 // 5 // 6 // 7 // 8 // 9

xxac

15 Ways to Maximize Sales on Poshmark

VTNF Picks

I somehow made more than $2,000 in just over a year on Poshmark — a popular clothing resale app targeted toward millennial women, for those unacquainted –and thought I would impart my wisdom on to all of you! If you already know how the app works, feel free to skip to the tips and tricks portion. Or, read the whole thing! Whatevs!! 

FOLLOWME

Getting Started 

1| Pre-order boxes from USPS (they offer free box delivery!) before you start listing. Keep in mind there are restrictions on what types of USPS boxes you can use to ship items once they sell — Priority Mail, flat rate only — so having the correct boxes delivered to you in advance is, in my opinion, the easiest way to handle shipping. I use these for garments and these for shoes/bags. I also like these envelopes because they slip easily in the USPS blue mailboxes. Do yourself a favor and order 10 of each in advance so you’re ready to roll when the green comes in! You can use a normal, unmarked box, however, this limits Poshmark’s ability to track the package, and heightens the risk your item could be, literally, lost in the mail. 

Also, ensure you’ll have access to a printer in order to print shipping labels. 

royalrecreations

2| Snap a few photos of the item you’re selling. Ensure the photo is taken in a well-lit environment with a plain — preferably white — backdrop. Model if possible. 

3| After you’ve uploaded pictures of the garment from multiple angles (3-10 pictures are ideal, depending on the product) fill out the listing details. This includes the item category, size, brand, color, and whether it is new with tags (this is subject to verification.) For higher-end items (think J.Crew and up) I also provide a photo of the tag so the buyer knows it’s legit. 

4| Provide a description. This should include details or notes on if it runs small or big, material/pattern/texture, measurements when applicable, and any stains, rips or damages. 

5| Provide the original price and determine your asking price for the item. This does not need to be exact, however, should be a realistic amount. Search the item to get an idea of what other buyers are offering. Remember that Poshmark keeps 20 percent of your total sale.

Your First Sale 

Sales can be made one of two ways — either a user selects ‘Buy Now’ on one of your items for the price it’s listed, or, more commonly, when you accept an offer a potential buyer makes on something in your closet. For the latter, you have 24 hours to either accept an offer from a user or, counteroffer a different amount. Should you choose not to respond to the offer, it will become null after 24 hours, and you will not be able to accept it.

ShoptheGram2

1| Print the shipping label included in the email confirmation. Once an order from your closet has been completed, you will have seven days to ship the item. I recommend shipping earlier rather than later, as your average shipping time is disclosed publicly on your ‘Seller Stats’ tool, and taking a long time to ship can ultimately impact your seller rating. 

2| When packing your item, it’s common — but not necessary! — to include a card and tissue paper. I haven’t noticed this having a huge impact on my sales, but it could, theoretically, encourage repeat buyers. Also, be sure to double and triple tape EVERYTHING so that the item does not fall out of the box. 

Poshmark2.jpg

3| Drop the package in a USPS mailbox or at a post office within 1-6 days of purchase. After day seven, the buyer will be given the option to cancel the order, and many do. I seriously recommend finding a post office that offers easy drop off for prepaid boxes — it will save you a ton of time! You can also schedule a package pickup if you know you’ll be home during the day. 

IMG_1881

4| Check for confirmation. You will receive a confirmation email once the item is checked in with the post office (typically within 24 hours of drop-off) and again when it reaches its destination. From there, the buyer will be given five days to accept and rate the item, or, open a case against it. After five days, the earnings are automatically added to your Poshmark account even if the buyer does not provide a rating. 

Buyers can open a case if they found something to be wrong or unsatisfactory with the item you sent. Should this occur, you’ll have the ability to communicate your side of things with a rep through the app and/or via email. I’ve only had this happen twice — once when an item didn’t fit the buyer and once when an item fell out of the box — and in both instances, Posh allowed me to keep the earnings. That said, it is important to disclose any pre-existing damages, alterations, rips, or stains in the description of your item — this will help reduce buyer dissatisfaction, keep your seller rating high, and save you a lot of hassle in the long run. 

5| Reap your rewards. You can opt to have your earnings transferred to your bank account, or keep them in Poshmark and use them toward a purchase of your own. More on my tips for buying on Poshmark coming soon! 

FOLLOWME

Tips + Tricks

1| Model dark clothing and jeans. It can be hard to see lines, seams, textures, fit and potential rip/tears on darker garments. 

Poshmark1

2| Always provide length measurements for skirts and dresses. Keep a tape measure in your underwear drawer so you know where to find it when you’re listing items. If you’re modeling an item, you will get asked your height by users about a million times, so it helps to provide that information in the description, as well. 

3| Give detailed descriptions of patterns and textures. For example, instead of saying ‘plaid’ use keywords like madras, Blackwatch, gingham, checkered, Herringbone, and houndstooth to attract buyers on the prowl for a specific look.

4| Keep the in-app categorizations vague. The system will prompt you to select sub-categories for products. For example, you can list a dress as a mini, midi, or maxi dress, or, simply file it under ‘dress.’ I actually find the latter is more helpful, as narrowing the category can lessen the number of people who see your product in general. 

royalrecreations

5| Name-brand items tend to perform better than boutique and lesser-known items. If you’re selling something from a well-known, high-end brand (think Tory Burch, Lilly Pulitzer, Vineyard Vines) then you’ll want to make sure to mention that in the item title, description and select in when setting up the listing. Conversely, for items from discount brands (think Forever 21, H&M, Boo Hoo), it’s best to leave that out of the description and title, as many buyers will assume they can purchase a new version of the item for a similar price point. For high-end items you purchased from lesser-known brands, taking time to harp on the quality and where you purchased the item will help instill confidence in potential buyers. 

6| Offer a bundle discount. To create a bundle discount, head to ‘My Seller Tools,’ then ‘My Seller Discount.’ From there, you can set item and discount thresholds based on what you think makes the most sense for your closet. FYI: My discount is 15% off for two items or more. 

7| If you are offering a bundle discount, make sure to mention it in descriptions — and model items together! For example, if you’re selling a skirt and wedges, wear them together in the item’s cover photo, and mention the percentage the user will save if they opt to purchase both. 

8| Price items 15% higher than you’d like to receive, and 25% higher than what you’ll accept. The majority of my sales included some sort of offer negotiation.  I calculated the average price paid by the buyer was 20-25% lower than my asking price, so it’s better to aim high. 

9| That said, be mindful of price thresholds. Remember that users can filter based on price, so instead of charging $26 for something, charge $24 so your item won’t be hidden from interested buyers who chose to see items for $25 or less. 

10| Share your items and others’ items often. When a user searches for a product, the app shows items in the order they were last shared, as opposed to when they were listed. So, there’s incentive in continuing to share products even after they are listed. Also, I’ve noticed the algorithm seems to reward activity from sharing the items of other users, too, and I’ve often made sales during periods when I’ve been most active liking, sharing and engaging on the app. 

11| Use private offers and re-engage with users who expressed interest in one of your items. Apart from staying on top of questions and comments users leave on your items, you can also make anyone who creates a bundle with your items a private offer to help encourage a sale. To do this, hit the double hanger icon in the right corner after receiving a notification that someone has created a bundle, click ‘View Dressing Room,’ then click the blue offer button. From there, you’ll be able to offer a special price — or, another incentive, like free or discounted shipping — for that user only. 

12| Keep all items you have “on the market” in the same, safe place. Mine are in a box under my bed, along with my USPS boxes, so everything is ready to go once I make a sale. 

13| Remain mindful of holidays and payday. Be sure to share pricier items on Friday mornings when users are feeling looser with their money. Keep holidays in mind, as well. For example, share swimwear a few weeks before Labor Day, plaid and red items a few weeks before the first day of December, etc. iPhone reminders are clutch! 

14| Make sure to reorder boxes in advance. Remember, USPS takes their sweet time delivering them, so be sure to stay on top of things! 

15| Don’t forget: beauty, hair, and menswear are fair game, too. I love purchasing samples of items I’m thinking about trying on Posh, and many don’t mind if hair and skin gently used. … and please don’t resell used makeup. Please. 

WhatsNew_Final

xxac